A PoE camera at the end of a long cable run
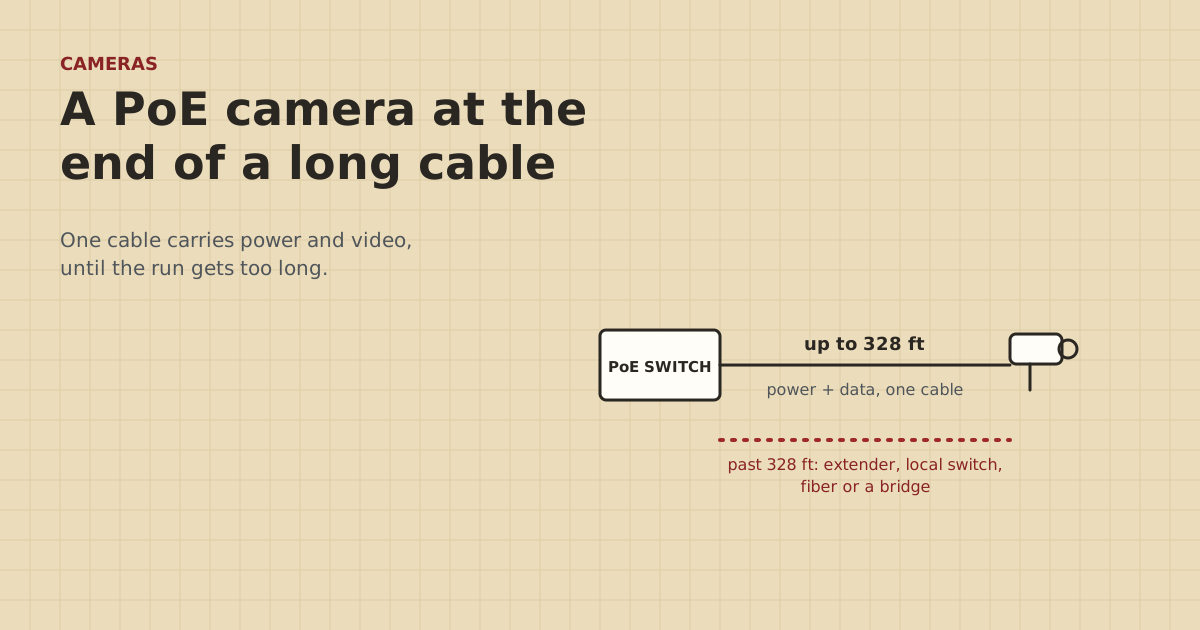
One Ethernet cable can carry both power and video to a camera up to 328 ft away. Past that, you need a different plan. Here's how to tell which one.
Research-based, not tested on a farmWorks with any internet provider at the house.
Key takeaways
- A PoE camera can be up to 328 ft (100 m) of cable from the switch or injector, patch cords included.
- The PoE standards already budget for cable loss: 802.3af sends 15.4 W and promises 12.95 W at the camera.
- Check the camera's max draw with night vision on. Many 4K cameras fit standard PoE. Some PTZ and heated models need PoE+.
- Past 328 ft: put a PoE switch near the camera if there's power, use one outdoor PoE extender, go LTE, or bridge to a solar setup.
- Use solid-copper, direct-burial cable underground and a surge protector where the cable enters the building.
A PoE camera can sit up to 328 ft (100 m) of cable from the switch or injector that powers it, patch cords included. Within that distance, one solid-copper Cat6 cable carries both power and video. The PoE standards already allow for the power lost in the cable. Past 328 ft, a single plain cable won’t do it. You need a PoE switch near the camera, an outdoor PoE extender, an LTE camera, or a wireless bridge.
This post covers the power math, the cable to use, and how to pick between those options for a camera at a gate, a lane or a far shed.
Why 328 ft, and what PoE has to do with it
Two limits stack up on a camera run:
- Data. Copper Ethernet (10/100/1000BASE-T) is specified for a 100 m channel: 90 m of permanent cable plus 10 m of patch cords. Go longer and the signal degrades. Links drop to 100 Mbps, video stutters, or the camera falls off the network.
- Power. PoE sends DC power down the same pairs. Some of it is lost as heat in the copper, and more is lost on longer and thinner cable. The PoE standards are written for a full 100 m run, so the power they promise at the far end already accounts for that loss.
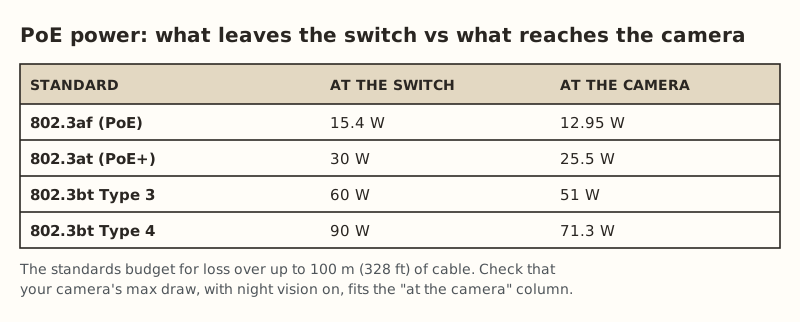
So the question isn’t “will the power make it?” If the cable is good and under 100 m, the standard promises 12.95 W for 802.3af or 25.5 W for 802.3at (PoE+). The real question is whether your camera’s max draw fits under that.
Check the camera’s power, with night vision on
Cameras draw the most at night, when infrared LEDs turn on, and in winter if they have a heater. That’s the number to check on the spec sheet, usually listed as “max” or “IR on”.
An example: Reolink lists its RLC-810A 4K bullet camera as IEEE 802.3af PoE, under 12 W max with IR on, and rates its night vision to 30 m (100 ft). Under 12 W fits inside 802.3af’s 12.95 W at the far end of a full-length run.
| Camera type | Typical PoE class needed | Check for |
|---|---|---|
| Fixed bullet or dome | 802.3af | Max watts with IR on |
| Camera with built-in floodlight or siren | Often 802.3at (PoE+) | Spotlight wattage |
| Pan-tilt-zoom (PTZ) | Often 802.3at or higher | Motor plus IR plus heater |
| Camera with heater for cold climates | Check: heater draw can be large | Heater wattage at low temperatures |
If a camera needs more than standard PoE, the switch or injector has to supply PoE+ (30 W) or 802.3bt (60 W for Type 3). Adding up several cameras on one switch is its own job. See adding up PoE watts at night.
The cable makes the difference
At long distances, cable quality decides whether the link holds.
- Solid bare copper, not CCA. Copper-clad aluminum has more resistance. More resistance means more voltage drop and heat under PoE, and the camera may reboot at night.
- Direct-burial cable underground. Use cable with a polyethylene jacket and gel or water-blocking tape. A 500 ft spool ran $149.99 (checked Oct 5, 2026). Details in outdoor vs direct-burial Cat6.
- Good terminations. A loose or badly crimped plug at the camera end adds resistance right where it hurts. Use a weatherproof junction box or the camera’s own sealed connector cap.
- Measure the real route. Fence lines, gates and drives add length. Add about 10% plus slack at each end.
A note on passive PoE: some bridge radios and older gear use passive PoE adapters with their own, shorter limits. TP-Link’s CPE510 adapter, for example, is rated for up to 60 m of PoE. Standard 802.3af/at switches and injectors are designed for the full 100 m. Don’t mix passive and standard PoE. More in passive vs standard PoE.
Camera within 328 ft: the simple setup
| Part | Qty | Price range (checked Oct 5, 2026) |
|---|---|---|
| Direct-burial Cat6, 500 ft | 1 spool | $149.99 |
| PoE switch, 5 ports (4 PoE+) | 1 | $44.99–$63.66 |
| or a single-port PoE injector | 1 | $19.99–$35.49 |
| Outdoor Ethernet surge protector | 1–2 | $11.69–$14.14 each |
Put a surge protector where the cable enters the building. Ubiquiti’s ETH-SP-G2 instructions say it must be grounded to work, either to a grounded pole or structure or by a drain wire to a grounding point. Have an electrician tie it into the building’s grounding system.
Camera past 328 ft: four ways to reach it
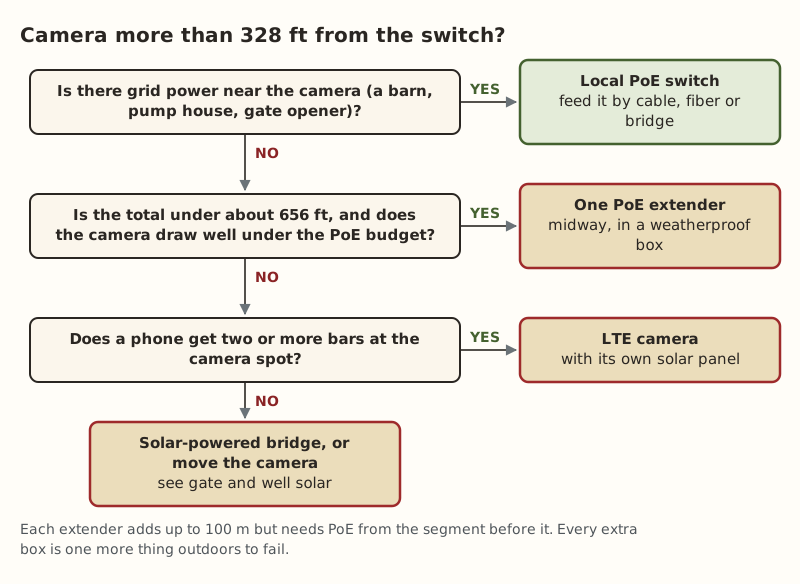
1. A PoE switch near the camera, with local power. If there’s an outlet in a pump house, a shed or a gate opener’s power supply within 328 ft of the camera, put a small PoE switch there. Then feed that switch’s data by the best way for the longer gap: buried cable if that leg is also under 328 ft, fiber ($60.06–$79.98 for a media converter pair), or a short-range bridge pair ($108–$139.99). This is the most robust option, and it scales if you add cameras.
2. One outdoor PoE extender. An extender sits midway, takes PoE in from the first segment, and passes data and power on for up to another 100 m. In our parts data an outdoor gigabit extender was $37.99 (checked Oct 5, 2026). It needs PoE from the first segment, and it uses some of the power budget itself. So use a PoE+ source if the camera is near its limit, and put the extender in a weatherproof box ($29.96–$74.99). One extender is fine. Chaining several puts more boxes outdoors to fail.
3. An LTE camera instead. If the spot gets two or more bars on a phone, an LTE camera skips the cable altogether. They ran $94.99–$279.99 (checked Oct 5, 2026), plus a monthly data plan. The gate and well solar guide covers solar sizing for the camera side.
4. A bridge to a solar-powered camera. For a gate with no power and no cell signal, a bridge radio and a camera can run from a small solar and battery setup. It works, but it’s the most complex option. Size the solar for the worst week of winter.
Worked example: gate camera 470 ft from the barn
The barn has power and a PoE switch. The gate is 470 ft away along the lane, with a gate opener powered from a small transformer at the gate.
- Option 1 fits: a small PoE switch in a weatherproof box at the gate, powered from a properly installed outlet there. Data comes from the barn by a short-range bridge pair, or by direct-burial cable if the leg is under 328 ft. Here it isn’t, so it’s the bridge or fiber.
- Option 2 also fits: 470 ft splits into two segments under 328 ft each, with one extender in a box at a fence post midway. The camera draws under 12 W, well under the PoE+ budget. Cheaper parts, but one more outdoor box, and no easy way to add a second camera later.
If more cameras are likely at the gate, option 1 wins. For one camera that won’t change, option 2 is fine.
Call 811 before trenching. A new outlet at a gate or shed is a job for a licensed electrician, especially outdoors where GFCI protection and wet-location covers apply. Don't run an extension cord as a permanent camera supply.
Test the run before you mount the camera
A long camera run is easiest to fix while the cable is still on the ground and the camera is on a bench.
- Terminate both ends and check continuity with a basic cable tester. All eight wires should light up in order.
- Plug the camera in at the far end, on the ground, with the real cable between it and the switch. Don’t test on a short patch cord.
- Cover the lens or test after dark so the infrared LEDs turn on. That’s the camera’s highest draw.
- Check the switch’s PoE page if it has one. Many managed and some unmanaged PoE switches show watts per port. Note the number with IR on.
- Leave it running for an hour at night. A camera that reboots on a long run usually does it within the first few IR cycles.
- Only then bury the cable and mount the camera.
If the camera reboots in this test, the usual suspects in order are: a poor crimp at the camera end, CCA cable, a passive injector on a standard-PoE camera, or a switch that’s already near its total PoE budget.
Common mistakes
- Counting only daytime watts. IR at night and heaters in winter raise the draw.
- CCA cable from a bargain spool. It’s fine on the bench and reboots the camera at the end of a long run.
- Daisy-chaining extenders across a pasture. Every box is a weak point. Move the switch closer instead.
- Passive injector on a standard PoE camera (or the other way round). It may not power on, or it may be damaged.
- No surge protector where the cable enters. Long outdoor runs pick up surges from nearby strikes.
What we don’t know
Exact power at the far end depends on cable quality, temperature and terminations, and we haven’t bench-tested any camera on a long spool yet. An owner-run 300 ft spool test at home is planned for the gear tests page and will be labeled as such. Camera power figures come from the maker’s spec sheet. Check yours.
Next step
Find the camera’s max watts with IR on, measure the real cable route, and see which side of 328 ft you’re on. Under it, follow the under-300-ft recipe. Over it, use the flowchart above, or run the spot through the planner. For remote viewing behind Starlink or any CGNAT connection, see which cameras work.
Go deeper
This post answers one question. The full guide covers the rest: Under 300 ft: buried Cat6 (direct burial vs conduit, the 328 ft limit, testing before you bury, surge protection).
Questions people ask
What is the maximum length for a PoE camera cable?
Can I run PoE farther than 328 feet?
Does PoE lose power over long cable?
Do I need PoE+ for a security camera?
What cable should I use for an outdoor PoE camera run?
Why does my PoE camera work during the day but reboot at night?
Sources
- Reolink RLC-810A specifications, retrieved Oct 6, 2026
- TP-Link CPE510 product page and specifications, retrieved Oct 6, 2026
- Category 6 cable - Wikipedia, retrieved Oct 5, 2026
- Power over Ethernet - Wikipedia, retrieved Oct 5, 2026
- trueCABLE Cat6 Direct Burial Ethernet Cable Unshielded, retrieved Oct 5, 2026
- 811 Before You Dig (Common Ground Alliance), retrieved Oct 5, 2026
- Ubiquiti ETH-SP-G2 Quick Start Guide, retrieved Oct 5, 2026
- TP-Link TL-POE160S, retrieved Oct 5, 2026
- TP-Link TL-SG1005P (4 PoE+ ports, 65 W), retrieved Oct 5, 2026
- POE Texas GAT-Extender IEEE 802.3af/at gigabit outdoor, retrieved Oct 5, 2026
- Voltive V-1236-1 Cat6 Direct Burial Gel Filled, 500 ft, retrieved Oct 5, 2026
- ETH-SP-G2, retrieved Oct 5, 2026
- Altelix NF100808 10x8x8 fiberglass NEMA 4X, retrieved Oct 5, 2026
- Reolink Go PT Plus, retrieved Oct 5, 2026
- 10Gtek Gigabit SM media converter, dual SC, 1000Base-LX, 20 km (2-pack), retrieved Oct 5, 2026
- Loco5AC (base $49.00; $54.00 surcharge incl.), retrieved Oct 5, 2026
Prices on this page are US retail ranges for named example parts, checked on the date shown, before tax and shipping. They change often.
Independent · not affiliated with SpaceX or Starlink. Links to Starlink’s plan pages use the site owner’s own referral link (your price is the same); there are no affiliate links (how we make money). It is general information, not electrical advice: where code applies, use a licensed electrician. Found an error? Tell us.