Common mistakes people make getting internet to a barn
Most failed barn links aren't bad luck. They're a handful of predictable mistakes made in planning, buying, digging, mounting and wiring. Here they are, in the order you'd hit them.
Research-based, not tested on a farmWorks with any internet provider at the house.
Key takeaways
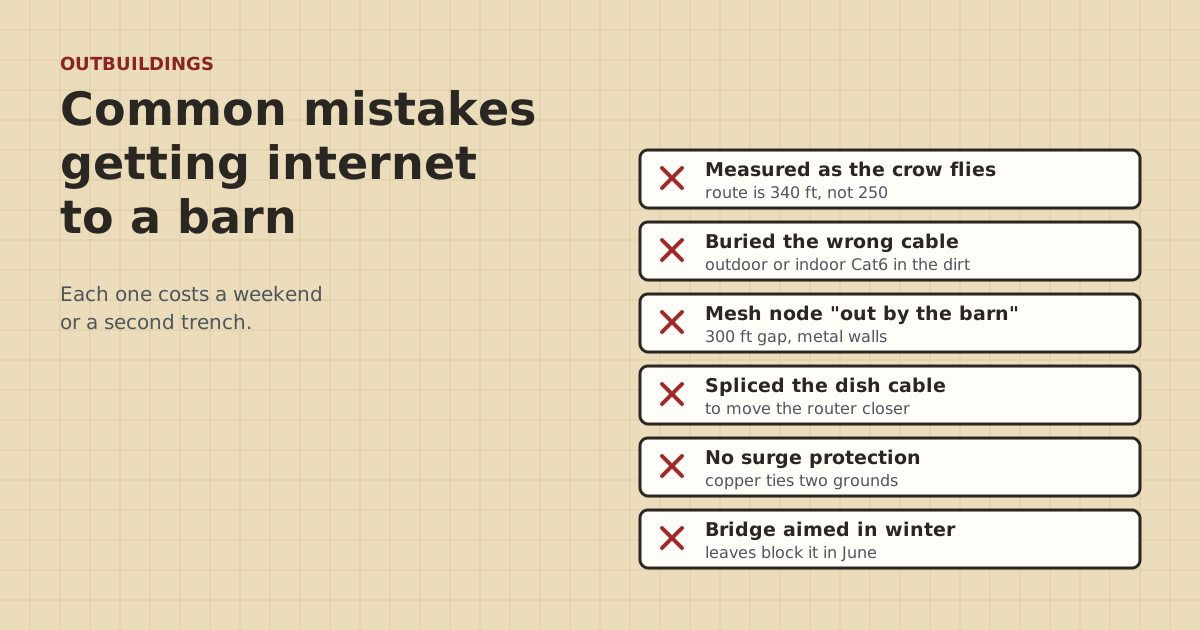
- Measure the real cable route, not the straight line. The 328 ft copper limit counts every bend and patch cord.
- Only cable sold as direct burial goes in the ground. Outdoor-only and indoor cable fail underground.
- Consumer mesh and Starlink mesh nodes aren't made to cross a gap of hundreds of feet. Wire or bridge it.
- Don't splice or extend the dish cable to move the router to the barn. Starlink advises against it.
- Protect copper runs at both ends, label everything, and test cable before you backfill.
The biggest mistakes people make getting internet to a barn are measuring the straight line instead of the cable route, burying cable that isn’t rated for the ground, expecting mesh Wi-Fi to jump a gap of hundreds of feet, splicing the dish cable to move the router closer, and leaving copper runs without surge protection. Each one is cheap to avoid and expensive to fix after the trench is filled or the radio is on the roof.
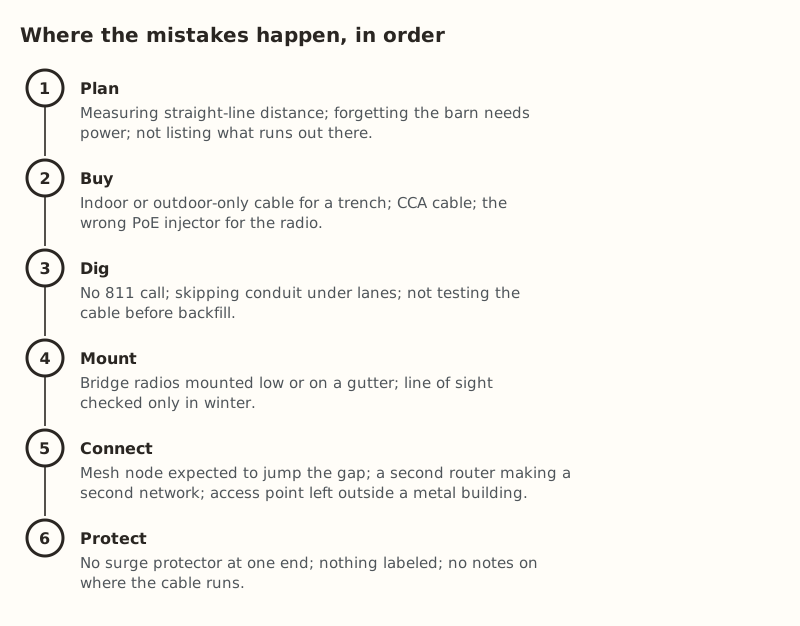
Below are twelve, in the order you’d run into them, with what to do instead and how to recover if it already happened.
Planning mistakes
1. Measuring as the crow flies
The phone map says the barn is 250 ft away. Then the cable has to go out the side of the house, around the drive, along a fence, through the barn wall and up to a shelf. Now it’s 340 ft. Copper Ethernet is limited to 100 m (328 ft) end to end, patch cords included. Past that, links come up slow, drop, or don’t come up at all.
Instead: walk the route with a measuring wheel, or measure it on a map in segments that follow the real path. Add about 10% for bends and 10 ft of slack at each end. If the total is near 300 ft, plan for a bridge or fiber. See how to get internet to a barn.
2. Forgetting the barn needs power
Every option except an LTE camera needs an outlet at the barn end: a switch, a PoE injector for a bridge radio, a media converter for fiber, or an access point. An extension cord across the yard isn’t a plan.
Instead: confirm there’s a usable outlet in a dry spot before you buy anything. If there’s no power, a licensed electrician can run a circuit, or for a few small devices a solar setup may work. Dish power is a different job.
3. Not listing what will run out there
“Internet in the barn” can mean one camera, or a calving camera, three security cameras, a laptop and a TV in the shop office. A camera-only barn with good cell signal might not need a link at all. A barn full of PoE cameras needs a switch with enough PoE budget.
Instead: list every device. Run them through the Outbuilding Link Planner.
Buying mistakes
4. Buying the wrong cable for a trench
Outdoor-rated (CMX) cable is made for sunlight above ground. Makers mark it not rated for direct burial. Indoor cable is worse. Only cable sold as direct burial has the polyethylene jacket and gel or water-blocking tape that keep water from wicking along the pairs. A 500 ft spool of direct-burial cable ran $149.99 (checked Oct 5, 2026).
Instead: check the jacket print for “direct burial” and “gel-filled” or “water-blocking”. Details in outdoor vs direct-burial Cat6.
5. Buying copper-clad aluminum (CCA)
CCA cable is cheaper because it’s aluminum with a thin copper coat. It has more resistance than solid copper, which hurts long runs and wastes power over PoE.
Instead: look for “solid bare copper” on the listing.
6. Plugging a bridge radio into the wrong PoE
Many bridge radios use passive 24 V PoE, not the standard 48 V PoE a camera switch provides. The wrong one can fail to power the radio or damage it. See passive PoE vs standard PoE.
Instead: use the injector that came in the box, or check the radio’s spec sheet before you plug it into a PoE switch port.
Digging mistakes
7. Skipping 811, or skipping the test before backfill
Hitting a buried line is dangerous and expensive. Finding a bad cable after the trench is filled means digging it all up again.
Instead: call 811 a few business days ahead. It’s free. Terminate both ends and test the cable on the spool and again in the open trench. A basic plug, crimper and tester kit was $114.96–$199.43 in our parts data if you don’t own one.
Call 811 before any trench, every time. If the trench runs near power lines, or you want power and data in the same trench, talk to a licensed electrician first.
Mounting mistakes
8. Checking the bridge path only in winter
Trees and leaves add a lot of loss at 2.4, 5 and 6 GHz. A bridge that’s fast in February can crawl in June.
Instead: check the line of sight in full leaf, or plan the mount high enough to clear the canopy when it fills in. Mount radios to something solid. A gutter or thin mast sways and knocks the link off aim. The bridge recipe covers mounting.
Connecting mistakes
9. Expecting mesh to jump the gap
Consumer mesh is built for houses. eero says to keep nodes 20–30 ft apart and no more than 50 ft. A barn 300 ft away is way out of range. Starlink routers also mesh only with Starlink mesh nodes (up to three), not with other brands. Putting the Starlink router in bypass mode to use your own mesh turns off its Wi-Fi and Starlink mesh nodes stop working.
Instead: wire or bridge the gap, then put an access point, or a mesh node with wired backhaul, inside the barn. See why mesh fails between buildings.
10. Splicing or extending the dish cable to move the router
It’s tempting: put the router in the barn, halfway between house and barn. But the Standard kit’s dish cable is 15 m. Starlink sells a 45 m Starlink-made replacement cable for some kits, and advises against splicing, extending or using third-party dish cables.
Instead: leave the dish and router where Starlink’s setup puts them, and extend the network from the router’s LAN side with a cable, bridge or fiber.
11. Leaving the access point outside a metal building
Metal blocks Wi-Fi most when it fully encloses a space, and an all-metal shop comes close. An access point mounted on the outside wall covers the yard, not the inside.
Instead: bring the cable inside and mount the access point there. Use an outdoor-rated one in a dusty or damp barn. Those ran $69.95–$219 (checked Oct 5, 2026). See Wi-Fi inside metal buildings.
A related mistake: plugging a second router into the barn end. That makes a second network, so phones and cameras in the barn can’t see devices at the house. Use a switch or an access point in bridge or access-point mode instead.
Protection mistakes
12. No surge protection, no labels, no notes
Copper between two buildings ties their grounds together. A nearby strike can raise one building’s ground and send a surge through the network cable, killing switch ports at both ends. Surge protectors such as Ubiquiti’s ETH-SP-G2 only work when grounded, either to a grounded pole or structure or by a drain wire to a grounding point.
Instead: put an outdoor Ethernet surge protector at each end ($11.69–$14.14 each) and have an electrician bond it to the building’s grounding system. Label both ends of every cable. Sketch where the cable runs, with distances from fixed points, and keep it with the property papers. More in surge protectors at both ends.
Quick reference
| Mistake | Cost if you make it | Fix before | Fix after |
|---|---|---|---|
| Straight-line measuring | Link over 328 ft, flaky | Walk the route | Bridge, fiber or a midway extender |
| Wrong cable in trench | Fails in months or years | Buy direct burial | Pull a new cable, or dig again |
| Mesh across the gap | Slow or no Wi-Fi | Wire or bridge | Add a link plus an access point |
| Spliced dish cable | Possible faults | Leave the router at the house | Restore the original cable setup |
| No surge protection | Dead ports after storms | Protector at both ends | Replace ports and add protectors |
| Bridge checked in winter | Summer slowdowns | Check in leaf | Raise mounts or change the path |
A ten-minute pre-flight check
Before you buy parts or dig, go through this list. It catches most of the mistakes above.
- Did you walk or measure the real route, with bends and slack, and write the number down?
- Is it under 328 ft? If not, have you ruled copper out?
- Is there a working outlet in a dry spot at the far end?
- Have you listed every device that will run there, including cameras that will draw more at night?
- Is the cable in your cart labeled direct burial, gel-filled, solid copper?
- If it’s a bridge: did you look at the line of sight from both ends, and will it still be clear in full leaf?
- Did you call 811, and is the trench route clear of power lines, septic, water lines and drain tile?
- Are two surge protectors on the list, one per building, and do you know who will bond them?
- Will the access point go inside the barn?
- Do you have a way to label both ends and sketch the route?
What we don’t know
How often each mistake happens isn’t something anyone has counted. This list comes from manufacturer guidance (cable makers, eero, Ubiquiti, Starlink help pages) and the problems people ask about most. The site owner hasn’t built a farm network. Owner-run gear tests at home will be labeled that way when they are published.
Next step
Before you buy anything, walk the route, confirm power at the barn, and list what runs there. Then read the distance recipes for the method your distance points to, or put each building into the planner. If you already have a link that misbehaves, start with barn link troubleshooting.
Go deeper
This post answers one question. The full guide covers the rest: Distance recipes: one table comparing every way to reach a building, with when each is the wrong choice.
Questions people ask
Why is my internet slow in the barn even though it is fast in the house?
Can I move my Starlink router to the barn with a longer cable?
Will a mesh Wi-Fi node work in my barn?
Do I need conduit for buried Ethernet?
Why does my barn link die after thunderstorms?
What is the most common mistake running cable to an outbuilding?
Sources
- eero Help: Where should I place my eeros?, retrieved Oct 5, 2026
- Category 6 cable - Wikipedia, retrieved Oct 5, 2026
- trueCABLE Cat6 Direct Burial Ethernet Cable Unshielded, retrieved Oct 5, 2026
- McElroy Metal: Does a Metal Roof Affect Wifi?, retrieved Oct 5, 2026
- Starlink Standard 4 X Specifications PDF, retrieved Oct 5, 2026
- Starlink Help: Can I add a third-party router or mesh system?, retrieved Oct 5, 2026
- Starlink Standard Accessories Guide PDF, retrieved Oct 5, 2026
- Starlink Help: How much cable do I have and how do I route it indoors?, retrieved Oct 5, 2026
- Interline: Fresnel Zone, Link Clearance and Signal Loss in Outdoor Wi-Fi Links, retrieved Oct 5, 2026
- Cabling Installation & Maintenance: Ground potentials and damage to LAN equipment, retrieved Oct 5, 2026
- Ubiquiti ETH-SP-G2 Quick Start Guide, retrieved Oct 5, 2026
- 811 Before You Dig (Common Ground Alliance), retrieved Oct 5, 2026
- Voltive V-1236-1 Cat6 Direct Burial Gel Filled, 500 ft, retrieved Oct 5, 2026
- ETH-SP-G2, retrieved Oct 5, 2026
- EAP225-Outdoor, retrieved Oct 5, 2026
- FS.com Cat6 shielded pass-through RJ45, 50/pack (144309), retrieved Oct 5, 2026
- TP-Link TL-SG1005P (4 PoE+ ports, 65 W), retrieved Oct 5, 2026
Prices on this page are US retail ranges for named example parts, checked on the date shown, before tax and shipping. They change often.
Independent · not affiliated with SpaceX or Starlink. Links to Starlink’s plan pages use the site owner’s own referral link (your price is the same); there are no affiliate links (how we make money). It is general information, not electrical advice: where code applies, use a licensed electrician. Found an error? Tell us.