Test the cable before you backfill the trench
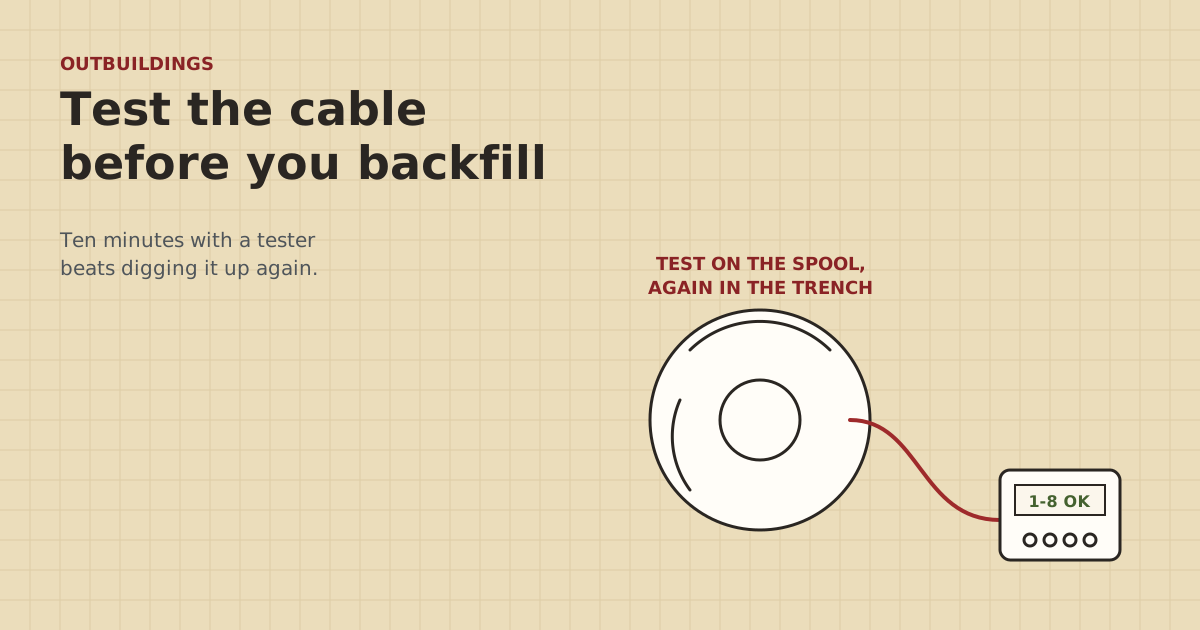
A bad crimp found with the trench open costs you a plug and five minutes. The same fault found after backfill costs you a weekend. Here's the order to test in.
Research-based, not tested on a farmWorks with any internet provider at the house.
Key takeaways
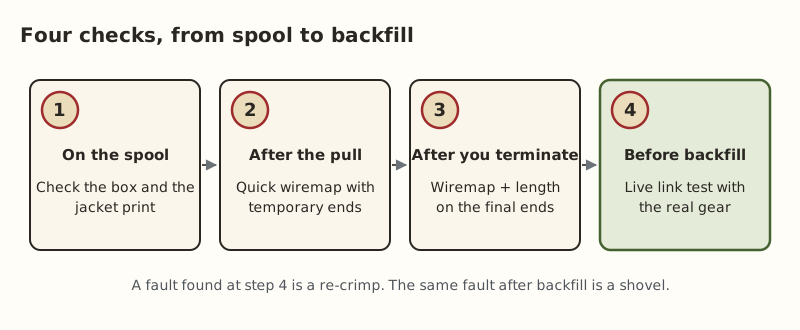
- Test four times: the spool before you lay it, after the pull, after you put the final ends on, and with real gear before backfill.
- A basic tester checks that all eight wires go to the right pins. It doesn't prove the cable runs at gigabit speed.
- The live link test is the one that counts: plug in the real switch, camera or access point and confirm a 1 Gbps link and steady power.
- A link that comes up at 100 Mbps instead of 1 Gbps usually means one bad pair. Fix it now, not after the dirt goes back.
- Leave slack at both ends, photograph the trench with a tape in the shot, and call 811 before any digging.
Test the run four times: glance at the spool before you lay it, do a quick wiremap after the pull, a full wiremap after the final ends go on, and a live link test with the real gear before any dirt goes back. A basic tester tells you the eight wires land on the right pins. Only the live test tells you the run actually works at gigabit speed and holds power for a PoE camera or access point. If anything fails, you fix a plug in five minutes instead of digging up a trench.
Here’s each check, what the tester is telling you, and what to do before you backfill.
Why testing before backfill matters so much
Once a cable is buried, every fault becomes a dig. You can’t see where it is, and the most common faults (a bad crimp, a nicked jacket, a kink at the building entry) are the ones a quick test would have caught with the trench open.
The ends are where most faults live. A crimp that looks fine can have one wire not seated. A keystone jack punched down in a cold barn can have a wire that missed the blade. Those are easy fixes with the cable in your hand. They are miserable fixes after the cable is buried, because you don’t know yet that the problem is at the end and not somewhere in the middle of the run.
What you need
- A cable tester. A basic continuity or wiremap tester has a main unit and a remote. You plug one into each end and it lights up each wire in turn. Some also estimate cable length. In our parts data a termination kit with shielded plugs, a crimper and a tester comes to $114.96–$199.43 (checked Oct 5, 2026).
- The real gear for each end. The switch or router port at the house, and whatever goes in the barn: a switch, an access point, a PoE camera.
- A laptop, ideally two, for the speed check.
- A tape measure and a phone for photos.
Check 1: On the spool
Before the cable goes in the trench:
- Read the box and the jacket. For a run in the ground without conduit, it should say direct burial. Direct-burial cable has a polyethylene jacket and water-blocking tape or gel so moisture can’t wick along it. Indoor cable isn’t built for this. The outdoor vs direct-burial guide shows how to read the print.
- Check the category and conductor. Cat6 (or Cat5e) with solid copper. Copper-clad aluminum is a poor choice for a long run, especially with PoE.
- Check the length. Measure the real route: trench length plus the climb up and into each building plus slack at each end. Copper Ethernet is limited to 100 m (328 ft) end to end, patch cords included. A 500 ft spool ($149.99) covers most single runs with room to spare.
- Look for damage. A crushed spool or a jacket with cuts is a reason to return it now.
Check 2: After the pull, before you terminate
Once the cable is laid in the trench or pulled through conduit, put temporary plugs on both ends, or use a tester with clip adapters, and run a quick wiremap. You’re looking for damage from the pull itself: a kink at a sharp bend, a jacket scraped through on a rock, a conductor broken where the cable was stepped on.
While you’re there, look at the cable along the trench. Walk the length. Look for kinks, tight bends, and places where it crosses sharp rocks. Fix those before you go on.
Check 3: After the final ends go on
Now terminate properly: a keystone jack in a box at each end is more forgiving than a plug on a solid-core cable, and easier to redo. Use the same wiring standard (T568A or T568B) at both ends.
Run the wiremap again. Every light should come on in order, 1 through 8, and the shield light if your tester has one and you used shielded cable. If your tester estimates length, compare it with your measured route. A big difference can point to a break partway along.
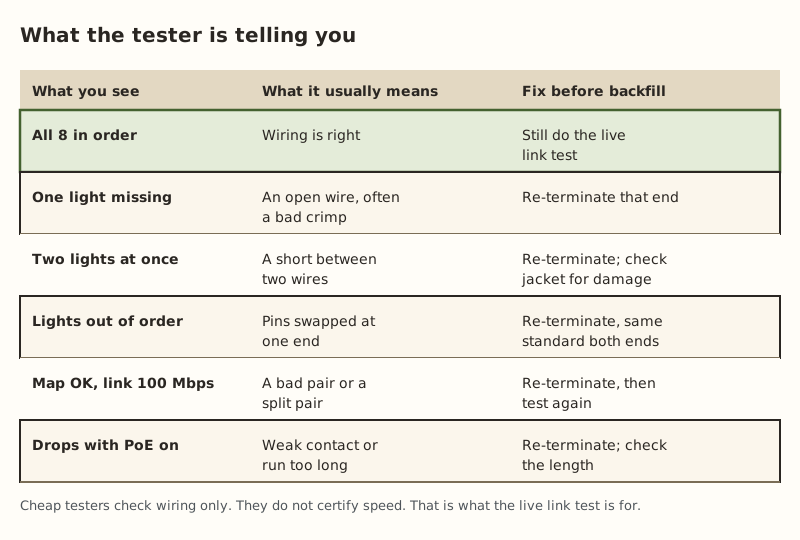
One thing a basic tester can miss: a split pair. That’s when the pin order is right at both ends but two wires from different twisted pairs are swapped the same way at each end. Continuity looks perfect. The cable still fails at speed because the twisting no longer cancels noise. The only cheap way to catch it is the live link test below.
Check 4: The live link test, before backfill
This is the check that matters. Plug in the real gear, exactly as it will run:
- House end into the router or switch that will feed the barn.
- Barn end into the switch, access point or camera that will live there.
- Check the link speed. Most switches show it with a light color or on a status page. A laptop plugged in at the barn end shows it in its network settings. You want 1 Gbps (often shown as 1000 Mbps).
- Push data across it. Copy a large file between two computers, one at each end, or run a speed test to a computer at the house. Watch for stalls or errors. A speed test to the internet only tells you about your internet, not the cable, if the internet is slower than the cable.
- Test power. If the barn device is powered over the cable, plug it in and leave it running for 15 minutes or more. Watch for reboots. A PoE+ port supplies up to 30 W at the switch end; a long run loses some on the way. Cameras with night-vision lights draw more after dark, so if you can, test into the evening.
If the link comes up at 100 Mbps, don’t backfill. Gigabit Ethernet uses all four pairs in the cable. 100 Mbps uses only two. When one of the other pairs is broken, badly crimped or split, the two ends often settle for 100 Mbps. Re-terminate both ends and test again.
Before the dirt goes back
- Leave slack. A loop of a few feet at each end gives you cable to re-terminate later.
- Photograph the trench. Take shots every so often along the route with a tape measure in the frame, showing depth. Note landmarks: “3 paces west of the gate post.” A buried-cable map saves the next person with a shovel.
- Check depth. Cable maker trueCABLE suggests 18–24 in without conduit and 8–10 in inside conduit. That’s a maker’s suggestion, not code; burial depth for communications cable under code is something we couldn’t settle from a source, so ask your local inspector if a permit is involved.
- Leave a pull string in conduit. If you used conduit ($9.53–$10.75 per 10 ft stick), a string in it makes the next cable a ten-minute job.
- Protect the ends. Where the cable comes up and into each building, protect it from weed trimmers, hooves and rodents. Plan an outdoor surge protector ($11.69–$14.14 (checked Oct 5, 2026)) at each end, bonded to the building ground by an electrician. The storms page covers why.
Call 811 a few business days ahead. It's free. If you want power and data in the same trench, or the route runs near power lines, talk to a licensed electrician before you dig.
Worked example: a 280 ft run to the shop
The route measures 262 ft of trench plus about 9 ft up and into each building, so roughly 280 ft of cable. That’s under 328 ft with some margin for patch cords.
- Spool check: direct-burial Cat6, solid copper, 500 ft spool. Fine.
- After the pull: quick wiremap with clip adapters shows all eight. Good.
- After terminating: keystone jacks in surface boxes at both ends. Wiremap passes. The tester’s length estimate is close to 280 ft.
- Live test: the shop switch shows a 100 Mbps link. Not good enough.
- Fix: re-punch the barn-end jack. One wire in the brown pair hadn’t seated fully. Link now shows 1 Gbps. A file copy runs at full speed. The PoE access point stays up through an hour of testing.
- Then backfill, with photos taken and a loop of slack left in each box.
Without the live test, the run would have gone in the ground “working,” at a tenth of the speed it should have had.
Common mistakes
- Trusting the wiremap alone. It doesn’t catch split pairs or show the speed. Always do the live test.
- Testing with a short patch cord at the bench, not the real run. Test the actual cable, end to end, in place.
- Testing without the real PoE device. A camera that’s fine on a short cord can reboot on a long run.
- Backfilling the same day without checking at night. If a camera’s night-vision draw is close to the power limit, you won’t see it at noon.
- No slack. Every re-termination uses an inch or two. Without slack, the next fix means a splice.
- Skipping 811. It’s free, and the line you hit might be a power line.
For more ways barn runs go wrong, see common mistakes getting internet to a barn, and for long runs feeding a camera, a PoE camera at the end of a long cable run.
What we don’t know
We can’t tell you how much margin your particular cable and gear have. A run that passes a live test today can still be damaged later by frost heave at the building entry, rodents or a surge. Burial depth for communications cable is a local code question we couldn’t settle from a source. The site owner hasn’t buried cable on a farm. An owner-run bench test with a 300 ft spool of direct-burial Cat6 is planned for the gear tests page and will be labeled as such.
Next step
Follow the under-300-ft cable recipe for the full job, from trench to surge protection, and put the four checks into it. If your route is longer than copper allows, run it through the Outbuilding Link Planner to see the fiber or bridge options.
Go deeper
This post answers one question. The full guide covers the rest: Under 300 ft: buried Cat6 (direct-burial vs conduit, the 328 ft limit, testing before you bury, surge protection).
Questions people ask
How do I test an Ethernet cable before burying it?
Can a cheap cable tester tell me if my cable will do gigabit?
Why does my Ethernet run show 100 Mbps instead of 1 Gbps?
Should I test the cable on the spool before I lay it?
How long can a buried Ethernet run be?
What should I do before I backfill the trench?
Sources
- Gigabit Ethernet 1000BASE-T (Wikipedia: uses all four pairs), retrieved Oct 6, 2026
- Fast Ethernet 100BASE-TX (Wikipedia: uses two pairs), retrieved Oct 6, 2026
- Category 6 cable - Wikipedia, retrieved Oct 5, 2026
- trueCABLE Cat6 Direct Burial Ethernet Cable Unshielded, retrieved Oct 5, 2026
- trueCABLE: A Guide to Cat6A Unshielded Direct Burial Ethernet Cable, retrieved Oct 5, 2026
- 811 Before You Dig (Common Ground Alliance), retrieved Oct 5, 2026
- Power over Ethernet - Wikipedia, retrieved Oct 5, 2026
- FS.com Cat6 shielded pass-through RJ45, 50/pack (144309), retrieved Oct 5, 2026
- Voltive V-1236-1 Cat6 Direct Burial Gel Filled, 500 ft, retrieved Oct 5, 2026
- trueCABLE Cat6 Gel Filled Direct Burial, unshielded, 1000 ft, retrieved Oct 5, 2026
- JM Eagle 1 in. x 10 ft PVC Sch 40 Conduit 67462, retrieved Oct 5, 2026
- ETH-SP-G2, retrieved Oct 5, 2026
Prices on this page are US retail ranges for named example parts, checked on the date shown, before tax and shipping. They change often.
Independent · not affiliated with SpaceX or Starlink. Links to Starlink’s plan pages use the site owner’s own referral link (your price is the same); there are no affiliate links (how we make money). It is general information, not electrical advice: where code applies, use a licensed electrician. Found an error? Tell us.