Bypass mode with your own router: does it fix camera access?
A forum post says to put the Starlink router in bypass mode and use a 'real' router so your cameras work from town. Sometimes that helps. Often it just switches off your Wi-Fi.
Research-based, not tested on a farmWorks with any internet provider at the house.
Key takeaways
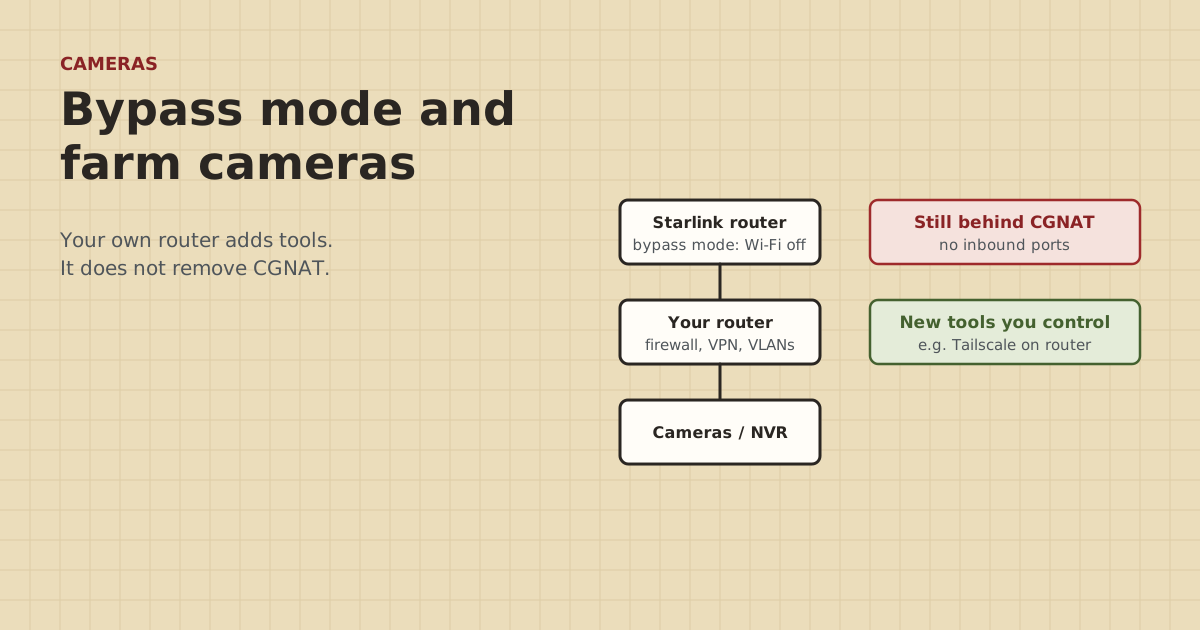
- Bypass mode turns off the Starlink router's Wi-Fi and hands everything to your own router. Starlink mesh nodes stop working.
- It does not remove CGNAT. Inbound connections and port forwarding still fail on a default plan.
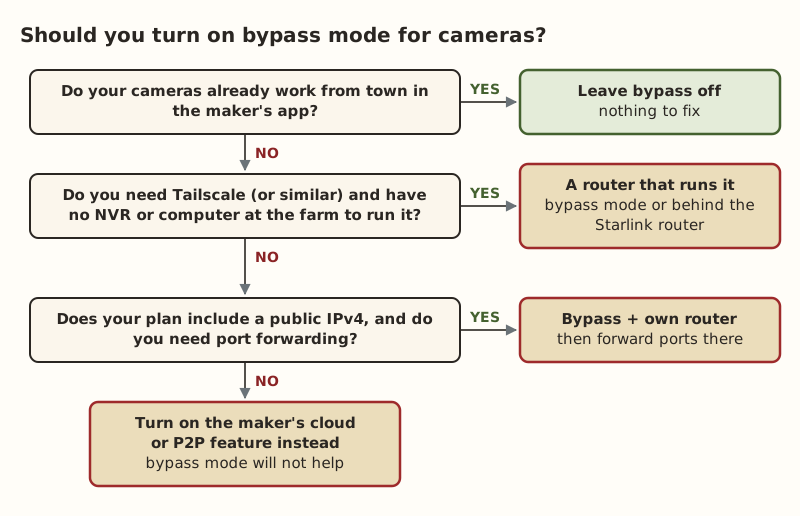
- Cameras that use the maker's cloud or P2P app work with or without bypass mode.
- Bypass mode helps when your own router does something you need: run Tailscale, separate cameras on their own network, or forward ports on a plan with a public IPv4.
- You can often get the same benefit by plugging your router into a Starlink router LAN port without bypass.
Bypass mode alone doesn’t fix remote camera access on Starlink. It turns off the Starlink router’s Wi-Fi and routing so your own router can run the network. But the connection is still behind Starlink’s CGNAT, which blocks all inbound ports, so port forwarding on your new router still has nothing to forward from. Bypass mode helps only when your own router does something you actually need: run a mesh VPN like Tailscale, put cameras on their own network, or forward ports on a plan that includes a public IPv4 address.
Here’s what changes, what doesn’t, and a quick way to decide.
What bypass mode actually does
Per Starlink’s help, putting the Starlink router in bypass mode in the app:
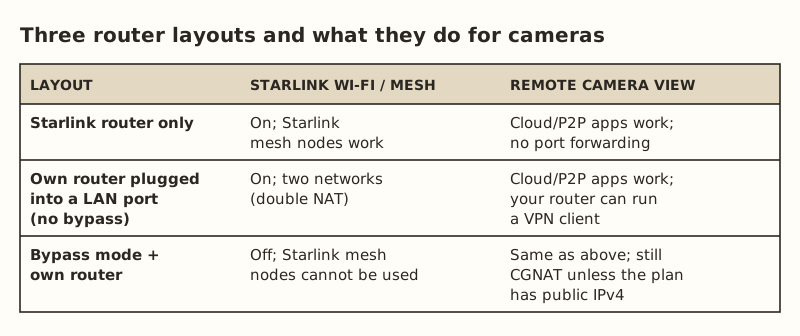
- Turns off the Starlink router’s Wi-Fi.
- Passes the connection straight through to whatever you plug in, usually your own router.
- Means Starlink mesh nodes can’t be used. Starlink routers mesh only with Starlink’s own nodes, up to three, not with other brands.
Your router then does everything: Wi-Fi, DHCP, firewall, and any VPN or VLAN features it has.
What it does not do: change the kind of internet address Starlink gives you. On a default plan, IPv4 still comes through CGNAT (the 100.64.0.0/10 range), with all inbound ports blocked. Starlink says a public IPv4 comes only with its Local and Global Priority plans. IPv6 is provided either way.
Why the forum advice exists
On cable or fiber at a typical home, “get a real router and forward the ports” is good advice. The Starlink router really can’t port forward. Starlink’s help says you need a third-party router plus a public IP. People read the first half and miss the second. Behind CGNAT, the forward opens a door on your router, but Starlink’s shared address in front of it has no door for you.
You can check this yourself. Look at the WAN IPv4 address on your router’s status page. If it starts with 100.64 through 100.127, you’re behind CGNAT, bypass mode or not. The full explanation is in why port forwarding a camera fails on Starlink.
When bypass mode (or your own router) does help
| What you want | Does your own router help? | Need bypass mode? |
|---|---|---|
| View cloud or P2P cameras from town | No: they already work | No |
| Run Tailscale for a local-only NVR, with no computer at the farm | Yes, if the router supports Tailscale | No. A router behind a Starlink LAN port works too |
| Put cameras on a separate network or VLAN | Yes, if the router supports VLANs | No. Behind a LAN port works. Bypass avoids double NAT |
| Use your own mesh system in the house | Yes | Yes: Starlink mesh won’t mix with other brands |
| Port forward to an NVR | Only with a public IPv4 plan | Yes, plus the plan |
| Control IPv6 firewall rules for cameras | Yes, if the router has good IPv6 controls | Usually simpler in bypass |
The point of the table: most of the time, the router is what helps. Bypass mode is optional.
The option many people miss: a router on a LAN port
Starlink’s Router 3 has 2 ports for Ethernet. You can plug your own router’s WAN port into one, leave the Starlink router in normal mode, and get:
- Starlink Wi-Fi still working in the house, and Starlink mesh nodes if you have them.
- Your own router’s features (VPN client, Tailscale, VLANs, camera network) on everything behind it.
- Double NAT: two routers each doing address translation. Cloud and P2P cameras connect out and don’t care. It only breaks inbound port forwarding, which doesn’t work behind CGNAT anyway.
For a farm where cameras live in the barn, a common layout is the Starlink router at the house as normal, a link to the barn, and the camera system on a router or NVR network at the barn end. Nothing about that needs bypass mode.
Should you turn it on?
Before you switch, look up how to turn bypass mode back off for your router model in Starlink’s help, and keep the Starlink app handy. With Wi-Fi off on the Starlink router, you’ll be relying on your own router to get back online.
Worked example: local-only NVR, no computer at the farm
Say a cattle operation (a made-up example) has a local-only NVR in the barn with six PoE cameras on a switch ($44.99–$63.66 for a 5-port PoE+ model in our parts data; six cameras need a bigger one). The NVR has no cloud feature. The owner wants to watch calving from town.
- Bypass mode alone: no help. Still CGNAT.
- Port forwarding on a new router: no help. Still CGNAT.
- What works: a router that supports Tailscale, set up as a subnet router for the camera network, with Tailscale on the owner’s phone. Tailscale uses NAT traversal to make a direct tunnel when it can and falls back to relay servers when it can’t, so no ports are opened.
- Bypass or not? Either works. If the family uses Starlink mesh in the house, keep the Starlink router in normal mode and put the Tailscale-capable router behind a Starlink LAN port, feeding the barn link.
Worked example: a family that wants its own mesh
Now say a different farm already owns a mesh system it likes, and wants to use it instead of Starlink’s Wi-Fi. That’s exactly what bypass mode is for. The cameras are Reolink with UID turned on. Reolink says that allows remote viewing without port forwarding, with the router only needing to allow outbound UDP. So cameras work the same before and after. Bypass mode is the right call here for the Wi-Fi, and it’s neutral for the cameras.
IPv6 behind your own router
Starlink provides IPv6, and it works on all Starlink routers. With your own router in bypass mode, IPv6 handling moves to your router, which matters for cameras in two ways:
- It can help. If your camera or NVR, its app and the network your phone uses are all IPv6-capable, a direct IPv6 connection skips CGNAT. Your router’s firewall decides whether to allow it.
- It can expose things. With IPv6, devices have globally routable addresses. A good router blocks unsolicited inbound IPv6 by default. If you open it up for an NVR, open only that device and port. Never open the whole camera network.
Most farms are better off with the maker’s app or Tailscale than with hand-built IPv6 rules. IPv6 is an option for people who already manage firewalls.
Security checklist when you add your own router
Any new router in front of your cameras is a chance to tighten things up, or to loosen them by accident:
- Change the router’s admin password and turn off remote admin from the internet.
- Turn off UPnP unless you know a device needs it. Behind CGNAT it can’t open anything useful, and if your connection ever gets a public address it could open ports you didn’t intend.
- Put cameras on their own network or VLAN if the router supports it. They can still reach the internet for their cloud apps, but they can’t see your laptops.
- Update firmware on the router, the NVR and every camera.
- Change default camera and NVR passwords, one per device.
- Write it down: router model, admin login (stored safely), what’s in bypass mode, and how to undo it. The next person to touch it may be you, two winters from now.
Common mistakes
- Turning on bypass mode to “open ports”. CGNAT is still there.
- Forgetting Starlink mesh nodes go dark. If the house relied on them, plan your own mesh first.
- Leaving port forwards and UPnP on with nothing to show for it. Turn them off.
- Not testing on cellular. Test remote viewing from your phone with Wi-Fi off.
- Buying a router for features you won’t set up. If the camera app already works from town, keep things simple.
- Locking yourself out. Know how to undo bypass mode before you turn it on.
What we don’t know
Starlink can change router behavior and plan features. The details here come from Starlink’s help pages as read on the dates in our sources, several through search results because those pages need JavaScript. We haven’t tested specific router models on a farm. Owner-run camera tests behind a home CGNAT connection will be posted on the gear tests page and labeled as such.
Next step
First check whether your cameras already work from town in the maker’s app, tested on cellular. If they don’t, turn on the maker’s cloud or P2P feature. If the system is local-only, follow the Tailscale steps in viewing cameras remotely behind CGNAT. Use bypass mode when you want your own Wi-Fi system, not as a camera fix. For the camera list, see which cameras work with Starlink.
Go deeper
This post answers one question. The full guide covers the rest: Viewing cameras remotely behind CGNAT (three fixes, easiest first).
Questions people ask
What does Starlink bypass mode do?
Will bypass mode let me port forward my cameras on Starlink?
Do I need bypass mode to use my own router with Starlink?
Does double NAT break security cameras?
Can I use my own mesh system with Starlink?
What is the best way to view farm cameras remotely on Starlink?
Sources
- Starlink Help: Can I add a third-party router or mesh system?, retrieved Oct 5, 2026
- Starlink Standard 4 X Specifications PDF, retrieved Oct 5, 2026
- Starlink Help: What IP address does Starlink provide?, retrieved Oct 5, 2026
- Starlink Help: Can I port forward with the Starlink router?, retrieved Oct 5, 2026
- Reolink Support: How to Enable UID for Reolink Products, retrieved Oct 5, 2026
- Tailscale Docs: Connection types, retrieved Oct 5, 2026
- TP-Link TL-SG1005P (4 PoE+ ports, 65 W), retrieved Oct 5, 2026
Prices on this page are US retail ranges for named example parts, checked on the date shown, before tax and shipping. They change often.
Independent · not affiliated with SpaceX or Starlink. Links to Starlink’s plan pages use the site owner’s own referral link (your price is the same); there are no affiliate links (how we make money). It is general information, not electrical advice: where code applies, use a licensed electrician. Found an error? Tell us.